July 27, 2021
By Nicolette Foss
Are you a hammered dulcimer newbie? Have you noticed your dulcimer just doesn’t sound as good as it did when you first started playing? Do people grimace in pain as you play? These may be signs your hammered dulcimer may be out of tune.
Just as any stringed instrument does, when the tension on the strings changes, it changes the pitch of the notes played. This will cause your hammered dulcimer to be what is called “out of tune.” Keeping it in tune will allow you to better identify pitches as well as produce a richer timbre to your music.
If this all sounds Greek to you, not to worry newbies! We’ve made this article beginner-friendly so you can easily follow along. Anyone can tune, even if you are brand-spanking new to the dulcimer world!
Is it Hard to Tune a Hammered Dulcimer?
Do not be deterred by any music jargon, learning how to tune your hammered dulcimer is not hard. It only looks complicated. And if you have tuned any other instrument, you will find that tuning the hammered dulcimer is really no different–just with more strings. Once beginners learn the basics and go through it methodically, it becomes pretty easy. You might even enjoy it!
So let’s break it down: The main goal of hammered dulcimer tuning is to match the pitch of your string to the ideal note the string should be set to. This is done by tightening or loosening the tuning pins. Here is the anatomy of the dulcimer to use as a guide as you go through this process:
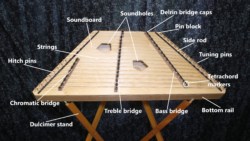
This is our Phoebe Chromatic Hammered Dulcimer. Not all dulcimers will have the smaller, third bridge indicated in this photo.
Items You Will Need to Tune Your Hammered Dulcimer
Below is a list of the things you will need for hammered dulcimer tuning:
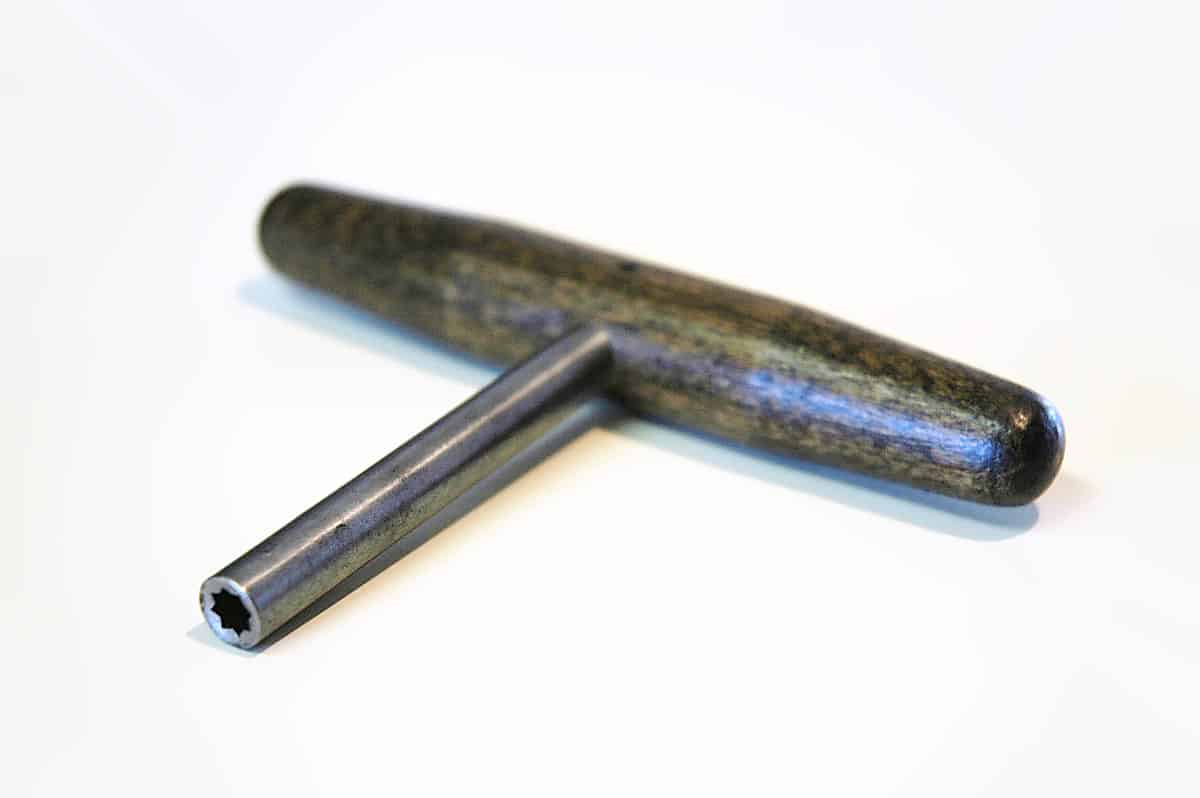
- Tuning wrench: You must have a tuning wrench to adjust the strings of your dulcimer. We supply a quality T-handle tuning wrench with every dulcimer we send out. If you have a different kind of tuning wrench, it will work, but we recommend the T-handled wrench with the star tip because it allows a better grip to help you precisely tune your instrument. If you don’t have one, you can get one here.
- Tuner: We like to use either a chromatic electronic tuner (like the Snark SN1X electronic tuner) or a reliable tuning app on a smartphone (check out our post on recommended tuning apps). Tuners listen to the pitch of your string and let you know how sharp or flat (how high or low) your string is by signaling with a meter or a light.
- Tuning diagram: You will need a tuning diagram for your dulcimer (If you’ve bought our popular Chickadee (non-chromatic) model, you can get that 13/12 tuning chart here. If you have another model, skim the tuning diagram list here. Please note that there are chromatic and non-chromatic models in the list. If your dulcimer was not built by us, you will need to find the diagram that goes with it. You may be able to get one from the builder of your instrument. Tuning charts vary, and are specific to each builder and model of the hammered dulcimer. There are a lot of similarities, but also a lot of differences, so make sure you have the one meant for your dulcimer. On our diagrams, we also include a number beside the note name of a string. This is the gauge of that string. If you ever need to replace it you will know what size string to buy.
- Solid surface to work on: Choose a good solid surface to put the dulcimer on that is at an appropriate and comfortable height for you. You may want to use a table or a fixed or adjustable stand for your dulcimer.
- Something to pluck with: Typically, Chris uses his fingernail to tune. However, if you have a nice manicure going on, you can use a guitar pick!
- A quiet room: You will want to minimize noise when you tune your hammered dulcimer because some ambient noise can interfere with the notes your tuner picks up.
- About 10 minutes: It may seem like it will take forever! But after you’ve done it a few times, it will become second nature and only take about 10 minutes maximum.
Alright, ready? Let’s get started!
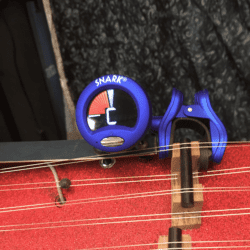
This is how we attach our Snark tuner. If you clip it to the top of the treble bridge, it can easily hear all notes played without having to move it.
How to Tune a Hammered Dulcimer For Complete Beginners
Step 1: Get Set Up
Start by placing your dulcimer on a dulcimer stand or a table at good working height. If you are using a chromatic electronic tuner attach it however you can to the instrument so that it can hear the notes. Depending on the tuner you have, you may need to move it several times as you tune. If using an app on your phone, open the app and put your phone down on the strings.
Step 2: We Start with the Treble Bridge
As pointed out in the dulcimer anatomy picture above, the treble bridge is the bridge located toward the center of the dulcimer. We like to start at the bottom of the treble bridge with the string that is closest to you. Follow that bottom string over to the right side of the dulcimer and find the tuning pin it is attached to. Put your tuning wrench on the pin attached to that string.
Step 3: Determine What Note That String Should be Tuned To
We like to start to the right of the treble bridge. Now look at your chart and see what note that string should make. This should be printed on the right side of the treble bridge in the diagram.
Use your finger to damp the same string on the left side of the bridge. This makes it easier for your electronic tuner to sense the right note.
While damping the string on the left side of the bridge, use your guitar pick or your fingernail to pluck the string on the right side of the bridge softly. Take a look to see what the app or tuner says it hears. There will be a note name appearing along with some version of a VU meter showing how flat or sharp the note is. Flat means the note is lower than it should be and you would need to tighten the string. Sharp means it is above what it should be, and you will need to loosen the string.
Side note: For you complete beginners, you must know that flats (♭) and sharps (♯) are also denoted in music. You will notice on our diagrams that these symbols are depicted. For instance, a G♯ note would mean a note a half step higher in pitch than a G. A B♭ note would refer to the note that is a half step lower than a B note.
Step 4: Adjust the String’s Tuning Pin With Your Tuning Wrench
Gently and slowly turn the tuning pin with the wrench while continuously plucking the note. Do not use your wrist to turn the wrench; use your locked arm to provide the leverage. If the dulcimer is pretty much in tune when you start, the right note name will appear on your tuner or app.
But if for instance the bottom note on the treble bridge is supposed to be C# but the tuner is hearing C, then the string is ½ step flat. Tighten the string with the tuning wrench until the tuner or app says C#, then continue until the needle on the meter gets to the center.
Congratulations! You have tuned your first string!
IMPORTANT: One thing to be aware of at this point: If you are on some pin and cranking away, but the needle on the tuner is not moving, then you are tuning the wrong string. STOP! This is when you can break a string which will jangle your nerves and ruin your day (which is why we sell replacement strings). Another thing to note is that moving the pins just a little moves the string a lot! It only takes a small tweak to get a note in tune, so don’t be cranking away!
Step 5: Repeat For the String’s Buddy
Ok, so you’ve tuned one string. Now move the tuning wrench to the tuning pin right beside the one you were just on. The string attached to this pin is the buddy of the string you just tuned and should be tuned to the same note. The two strings together make up what we call a course. Use the same process and try to get this note as close as you can to be the same as the first string. Try to use your ear while double-checking with the tuner to get the second string in the course exactly in tune with the first. Eventually, you can learn to rely on your ear for the right notes, without your tuner!
Note: On your chart, you will notice there is another set of notes printed on the left side of the treble bridge. For our dulcimers, you should not have to tune the left side of the treble bridge because this side will automatically be in tune as you proceed. Once you have tuned a string on the right side of the bridge, the same string on the left side of the bridge will automatically be in tune to its proper note because the string slides across the bridge and the tension equalizes.
Step 6: Keep On Moving Up, Working Your Way Up The Top of Treble Bridge
Once you have tuned the first course, move up the treble bridge to the next note. Follow the lower of the two strings over to the side and put the wrench on that tuning pin. NOTE: this may or may not be the next set of pins up the pin block, so make sure you are on the correct pin!
Tune that string to the note the diagram calls for. Then tune its buddy just like you did for the first course. Continue up the right side of the treble bridge to the top. Once you’ve finished this side of the bridge, you can check a few notes on the left side with your tuner to make sure they match up with your tuning diagram. If they don’t, see Pro-tip #5 near the end of this article.
Step 7: After Tuning the Treble Bridge, Start at Bottom Of Bass Bridge
After you have tuned the treble, move to the bottom of the bass bridge located on the right side of your instrument. Start at the bottom and tune it in the same fashion. Note that only the left side of the bass is played, so you will only need to tune that side.
You are probably picking up speed at this point! Keep going until you have reached the very top string.
Step 8: Do a Happy Dance, You’ve Tuned Your First Hammered Dulcimer!
Did you get the dulcimer all tuned? Wow! You are now an official, newly minted hammered dulcimer tuner! Now that you’re a pro, did you know that you can make money doing this at festivals?
But if you are still having trouble figuring this out, watch our Tuning How-To videos to get a better visual representation of how to tune a hammered dulcimer.


If you are about ready to tear your hair out trying to figure this whole tuning thing out, leave us a comment or call Chris, and he can walk you through it!
Variations and Tips For Hammered Dulcimer Tuning
For chromatic hammered dulcimer tuning: You will notice in our picture of dulcimer anatomy, there is a third, shorter bridge we call a chromatic bridge. If your dulcimer has this extra bridge, you have a chromatic dulcimer. The bridge is usually on the left, but possibly on the right. You will tune it similarly to the other two bridges, but the notes are lower. Tune the chromatic bridge to the notes marked on your diagram.
Variations: You will probably notice that people tune their hammered dulcimer in different ways. Here are some common variations:
- Some hammered dulcimer players tune opposite of how we do it, by starting at the top of the bass bridge and working down, then onto the treble bridge from the top down. Or some will start on the lowest bass course and go up, then the lowest treble and go up. Use whichever method is most comfortable for you!
- Another approach is to tune all the “A” notes on it. Then tune all the “B♭” notes, then all the “B” notes, etc. until you’ve tuned all 12 notes of the scale. This approach certainly gets you to quickly memorize where all the notes are but has always seemed too complicated to us.
Pro-tip #1: A good way for beginners to memorize the names of the notes quickly and know where they are is to say the name of the note out loud as you tune each one. You can also do the same as you play a scale (learn scales here). Say the names of the notes as you play your first scale. You’ll be amazed how quickly you get the whole dulcimer memorized!
Pro-tip #2: Note strips are pieces of paper some people buy or make for their dulcimer that have the names of the notes. The strips are affixed to the top so that the names are directly under each string in the proper place. We don’t recommend using these. The reason is that you won’t memorize the notes or where they are, and this can slow your progress down. If you have to focus on each note name before striking the string it will become a crutch. Instead, use your diagram for reference, and learn to play by pattern. You can do it!
Pro-tip #3: For those who don’t read music, there are several notes that have two different names and your tuner may read one note, but the diagram says another. So, here they are: A# = Bb, C# = Db, D# = Eb, and F# = Gb
Pro-tip #4: Always tune all the strings on your dulcimer, not just the ones you think you will use. This makes the dulcimer sound much better because the whole thing works together. When you strike a string it sets up sympathetic vibrations in other strings on the dulcimer. It is what gives the instrument that lovely sound, so keeping everything in tune will make it sound better.
Pro-tip #5: I am adding this based on feedback from Facebook. Theoretically, if you tune the strings on one side of the bridge, the same strings on the other side will be in tune, but that may not always be the case. The above system works for our dulcimers, and it is exactly how I tune after 30 years of experience. It works. But if the dulcimer you are tuning has 1/8″ Delrin bridge caps, not the 1/4″ caps that we use, then the string may have dug a furrow for itself, and may stick just a little in that furrow, so the tension won’t fully equalize. There are several tricks to get around this. Check with the tuner and see if both sides are in tune. If not, 1) lift the string off the bridge just a little then let it go back and check both sides again. Retune and keep on until both sides are in tune. Or 2) push down on both sides of the string to break that pesky sticking loose then check again, etc. Or 3) Tune down 1/2 step or so to break the string loose, then tune up to the note, then check both sides. If you are having a real problem with lots of strings not being in tune on both sides there are two basic causes. Most likely: 1) The strings are old and though you may not be able to see it, there is microscopic corrosion that is hanging the strings up in the Delrin. If so, then get a Q-tip and on one end put a couple drops of light oil like sewing machine oil or 3 in 1 or automatic transmission fluid. Any light non-drying oil, NOT WD-40. Then go along and touch the oil to the strings where they cross the Delrin. The oil will transfer and creep down in the groove and lubricate it and the string will slide freely across the bridge. This’ll fix it. If you’ve made a mess, just wipe up with a rag. The oil will not hurt your strings or bridge. Or 2) The bridge needs to be reset, it is not in exactly the proper place to divide the strings in the exact 2 to 3 ratio so both sides are in tune. If so, there is a video procedure for that on our website under Resources. It isn’t difficult, but first do the oil trick to eliminate that possibility before tackling moving the bridge. If you’ve done some of these things and fixed your dulcimer, congratulations! You are now a professional quality dulcimer tuner!
Keep Your Hammered Dulcimer in Tune
We recommend tuning your hammered dulcimer about once a week to keep it sounding good! But how long will your hammered dulcimer stay in tune? That depends on a variety of factors like temperature and humidity, so it varies.
Now that you’ve successfully tuned your dulcimer for the first time, your instrument should sound like a dream. But if you are still experiencing reactions of painful grimaces and winces of agony to your playing, you may want to try out these free video lessons from Jess Dickinson or Brett Ridgeway. If you have quickly caught on to how to tune, you can easily learn how to play a hammered dulcimer!
How was the hammered dulcimer tuning experience for you? Was it a pain, or easy as pie? Share your experience below in the comments!
Click here for a printable version of this post.
Featured image: No machine-readable author provided. Amcbride~commonswiki assumed (based on copyright claims)., CC BY-SA 3.0, via Wikimedia Commons
 About the author: In her childhood, Nicolette Foss could be found underneath piles of sawdust in her father’s hammered dulcimer workshop. She helped with odds and ends in the business, attended folk music festivals, and learned the importance of hard work. These days, you can find her belly dancing to instrumental Arabic music, learning the Serbian language, making short films with friends, and cuddling her cat Georgie. If you’d like to hire Nicolette for content writing or copywriting work, contact her at: nicolettelady@protonmail.com
1 Comment
-
Jim Przywara says:
For each string needing adjustment, de-tune the string a bit first, before bring it up to pitch. this does 2 things: it lets you know you’re on the correct tuner for the string, and also gets the string to slide a bit on the bridge cap.
For wound strings, Always lift the string off the bridge cap before, and also after tuning the string to even the tension across the bridge cap. The ridges on the wound string like to catch and hold, and this is how you avoid breaking the wound strings.